
how to
gain stage / level balance
a mix?
Last Updated: December 20th, 2025
Read time: 1-Min
When you spend so long mixing a track, adding all the effects you need to make the vocals shine, for the guitars to have clarity, and for the drums to be punchy, it can be really disheartening to listen back the next day and feel like the whole mix is lacking direction.
Luckily, gain staging properly can fix about 70% of a mix and there’s a really simple way to ensure you can hear all of the instruments in the mix. In this article, we will teach you how to gain stage / level balance properly.
-
To begin gain staging, first identify your lead stem in the track. In this example, the chorus vocal is the leading element of the track.
-
Set the lead stem to -5dB with all other stems reduced to silence. (You can increase your speaker/headphone level on your interface to allow for playback at your desired volume).

Here we have the Chorus Vocal stem set to -5dB. Displayed in Steinberg Cubase 11.
-
Identify the second most important stem in the mix (here that would be the lead guitar) and slowly bring the level of that stem up until you can hear it but it doesn’t overpower the lead element.
The Guitar Stem has now been increased to compliment the lead vocal. Displayed in Steinberg Cubase 11.
-
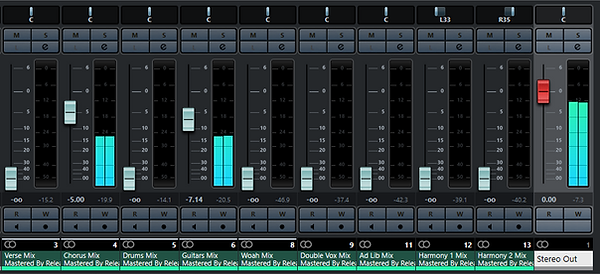
Continue to work through your stems one by one in order of importance, slowly increasing their volume until they are audible in the mix but not overpowering the lead element. Your mixer will end up looking like this.
-
Once you have set all of the stems, listen to the mix through in its entirety but do not move any of the faders. Simply make a note of what further changes you would make.
(Maybe you wish that the drums had more punch in the hook, but they otherwise sound good in the verses - great, that change can be reserved for automations.
Maybe the guitar needs to cut through by 1dB - 2dB more in the piece, great once you have listened to the track the whole way through, you can make that change.)
During the level balancing process it's important to not only hear your track but to really listen. By taking the time to listen and make note rather than immediately jumping in you are making more informed observations of the mix and ultimately returning a better result.
Once you have completed this part of the gain staging, your mix should be 70% complete. From here there will be the opportunity to automate different sections of the track to allow for more dynamic contrast (an easy choice here is a level increase for the chorus/hook and a level reduction for the verses). You will also be able to make some EQ reductions in areas where instruments share frequencies in common. We call that Considerate EQing and will touch on that more next week!
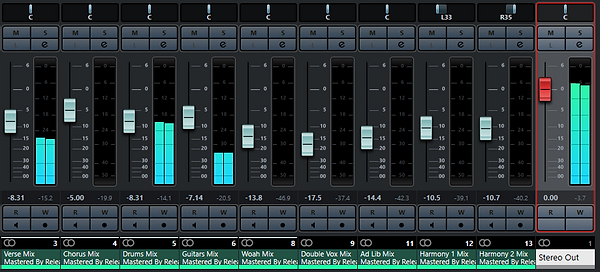
TOP TIP: Mix with headroom in mind! This will save tons of time later in the mixing stage. This is why we recommend setting the lead stem to -5dB as this is a great level to mix to, allowing your mix to breathe without pushing to up to the digital clipping point of +0.00dB.
You can see that the Stereo Output for this mix is -3.7dB that means you are achieving a healthy 3.7dB of headroom for your mastering engineer to work with!

